Sunday, March 15, 2015

Military Baby Booties


I used my "Mary Jane" pattern as the foundation for these military baby booties. They are fast and simple to make... a perfect gift for a military family.

Size: 0-3 months

Materials:
 Simply Soft Yarn
Size "H" hook

Sole Piece: Make 4
Ch 9,
Row 1: 2 sc in second ch from hook, sc 6, 3 sc, (now working on opposite side of foundation ch) sc 7. Join with slst at beginning of row now and throughout.
Row 2: Ch 1, sc, 2 sc, sc 4, 2 sc, 2 hdc, 2 dc, dc, 2 dc, 2 hdc, 2 sc, sc 4, 2 sc.
Row 3: Ch 1, sc, 2 sc in next 2, sc 7, 2 sc in next 3, sc, 2 sc in next 3, sc 7, 2 sc in next 2.
Row 4: ch 1, sc 16, hdc 5, sc 15. Fasten off. (36 stitches)

To make the boot keep its form better, I doubled up the soles.

Beginning of top:
Row 5: Place wrong sides of "sole pieces" together. Working in back loops of one "sole piece" and both loops of other "sole piece", sc around.  


Row 6: Sc 13, hdc, dc, (dc dec) X3, dc, hdc, sc 13.
Row 7: Sc 11, hdc, dc, (dc dec) X4, dc, hdc, sc 10.
Row 8: Sc 12, (sc dec) X3, sc 11.
Row 9: Sc 8, 6 dc dec, sc 6.
Row 10: Sc around. (20 sc). Fasten off.
Row 11: Join in front middle sc in front lps only for first two sc, sc 16 working in both loops, sc in front loops only of last 2 stitches. Do not join!
Row 12: Ch 1, turn. Sc across.
Row 13: Sc dec, sc 16, sc dec.
Row 14-17: Ch 1, turn. Sc across. (18 sc). At the end of row 17, fasten off.


This is what your boot will be looking like at this point.

Tongue:


For the tongue, you will start by working in the 4 back loops you have left in row 11.
Row 1: Sc 4.
Row 2: Ch 1, turn. 2 sc, sc 2, 2 sc.
Row 3-7: Ch 1, turn. Sc across. Fasten off at end of row 7.

Laces: Ch 82 and fasten off. Weave into boots.

Sunday, March 8, 2015

Baby Beard Hat


Tonight I made this Baby Beard Hat. If you are looking for a quick gift to crochet, you may consider working on this. It will take you no time at all.


Size: 0-3 months

Materials:
Green and Brown Red Heart Super Saver Yarn
Size "G" hook
Thread
4 buttons

Hat: (with green)
Magic circle,
Row 1: Ch 1, 8 hdc. Join at the end of each row with a slst. Ch 1, but do not turn now and throughout.
Row 2: 2 hdc in each stitch. (16 hdc)
Row 3: (2 hdc, hdc) around. (24 hdc)
Row 4: (2 hdc, hdc 2) around. (32 hdc)
Row 5: (2 hdc, hdc 3) around. (40 hdc)
Row 6: (2 hdc, hdc 4) around. (48 hdc)
Rows 7-14: Hdc around. (48 hdc)
Row 15: Sc around. Fasten off. (48 sc)

Beard: (with brown)
Ch 31,
Row 1: Hdc across. (30 hdc)
Row 2: Ch 1, turn. Hdc 10, ch 10, skip 10, hdc 10. (20 hdc, 10 ch)
Row 3: Ch 1, turn. Hdc 30. (30 hdc)

Border:
Sc down sides of beard and on bottom of beard. Put 2 sc in each corner to keep edges from rounding. Once you get back to the top of the beard, slst and fasten off. Sew two buttons to each side of the beard and then connect beard to hat with the buttons. The buttons make the beard moveable.

Enjoy!!

Thursday, February 5, 2015

My Little Angel

Angel dress or simply an elegant dress.


Someone I volunteer with at the pregnancy center asked me to make an angel dress or angel wings, and this is what was inspired. It's a fairly simple pattern, but it does take a little time. If you have any questions, please leave me a comment, and I will reply to you ASAP.

Size: Approximately 0-3 months

Materials:
Size "H" hook for dress and shoes
Size "I" hook for bonnet
White Simply Soft Yarn
6 small buttons to attach wings to dress
1 medium button for back of dress
White thread
Ribbon

Dress:

Note: Ch 1 and turn at the end of each row until you hit round 12.

Ch 47,
Row 1: Skip 3 ch for button hole. Sc 44.
Row 2: Sc 44.
Row 3: Sc 11, 3sc, sc, 3sc, sc 16, 3sc, sc, 3sc, sc 11.
Row 4: Sc 12, 3sc, sc 3, 3sc, sc 18, 3sc, sc 3, 3sc, sc 12.
Row 5: Sc 13, 3sc, sc 5, 3sc, sc 20, 3sc, sc 5, 3sc, sc 13.
Row 6: Sc 14, 3sc, sc 7, 3sc, sc 22, 3sc, sc 7, 3 sc, sc 14.
Row 7: Sc 15, 3sc, sc 9, 3sc, sc 24, 3sc, sc 9, 3sc, sc 15.
Row 8: Sc 17, ch 13, skip 11, sc 28, ch 13, skip 11, sc 17, ch 4 and slst in beginning of row 8 to form a ring. Make sure the top is not twisted.
Round 9: You will sc around, but I broke it down to make sure you have the right amount of stitches. Sc 4, sc 17, sc 13, sc 28, sc 13, sc 17. Join with slst in beginning stitch. At this point, you should have 92 sc.
Rounds 10-11: Sc around, but decrease 1 at the end of each row so the shell rows you will start in round 12 will come out evenly. At the end of row 11 you should have 90 stitches.

Round 12: (Sc, skip 2, 5 dc, skip 2) repeat around. Join with slst in first sc.
Round 13: Ch 3 and 4 dc in first sc, (skip 2, sc, skip 2, 5 dc) repeat around. Join with slst in beginning ch 3.
Round 14: Slst to middle of shell, ch 1, (Sc in middle dc of shell, 5 dc in next sc) repeat around.
Round 15: Ch 3, 4 dc in same stitch, (Sc in middle dc of shell, 5 dc in next sc) repeat around.
Rounds 16-26: Repeat rounds 14 and 15.
Round 27: Continue with the same pattern, but instead of doing 5 dc for the shell stitches, do 6 dc.
Round 28: Continue with the same pattern, but instead of doing 6 dc for the shell stitches, do 7 dc. Note: Sc in-between middle dc of shell since there is an even amount of dc in the previous round.
Round 29-37: Continue with the same pattern now continuing with 7 dc for shells.
Round 38: Continue with the same pattern, but instead of doing 7 dc for the shells, do 8 dc for shells.
Round 39: Continue with the same pattern, but instead of doing 8 dc for the shells, do 9 dc for shells.
Note: Sc in-between middle dc of shell since there is an even amount of dc in the previous round.
Round 40-41: Continue with the same pattern now continuing with 9 dc for shells. At the end of round 41, fasten off.

Neck:
Join yarn at corner of neck. (Sc, ch 2) across neck. Slst before fastening off.

Arms: For right arm, join with sc on back of dress at the bottom where the back of the armpit would be. For the left arm, join with sc on front of dress at bottom where the front of the armpit would be.


Sc  28 around. Join. Ch 1, but do not turn.
Row 2: This is a partial round. Sc 16. Ch 1, turn.
Rows 3-5: Repeat row 2.
Row 6: (sc, ch 2) across. Instead of sc in last stitch, slst. Fasten off.

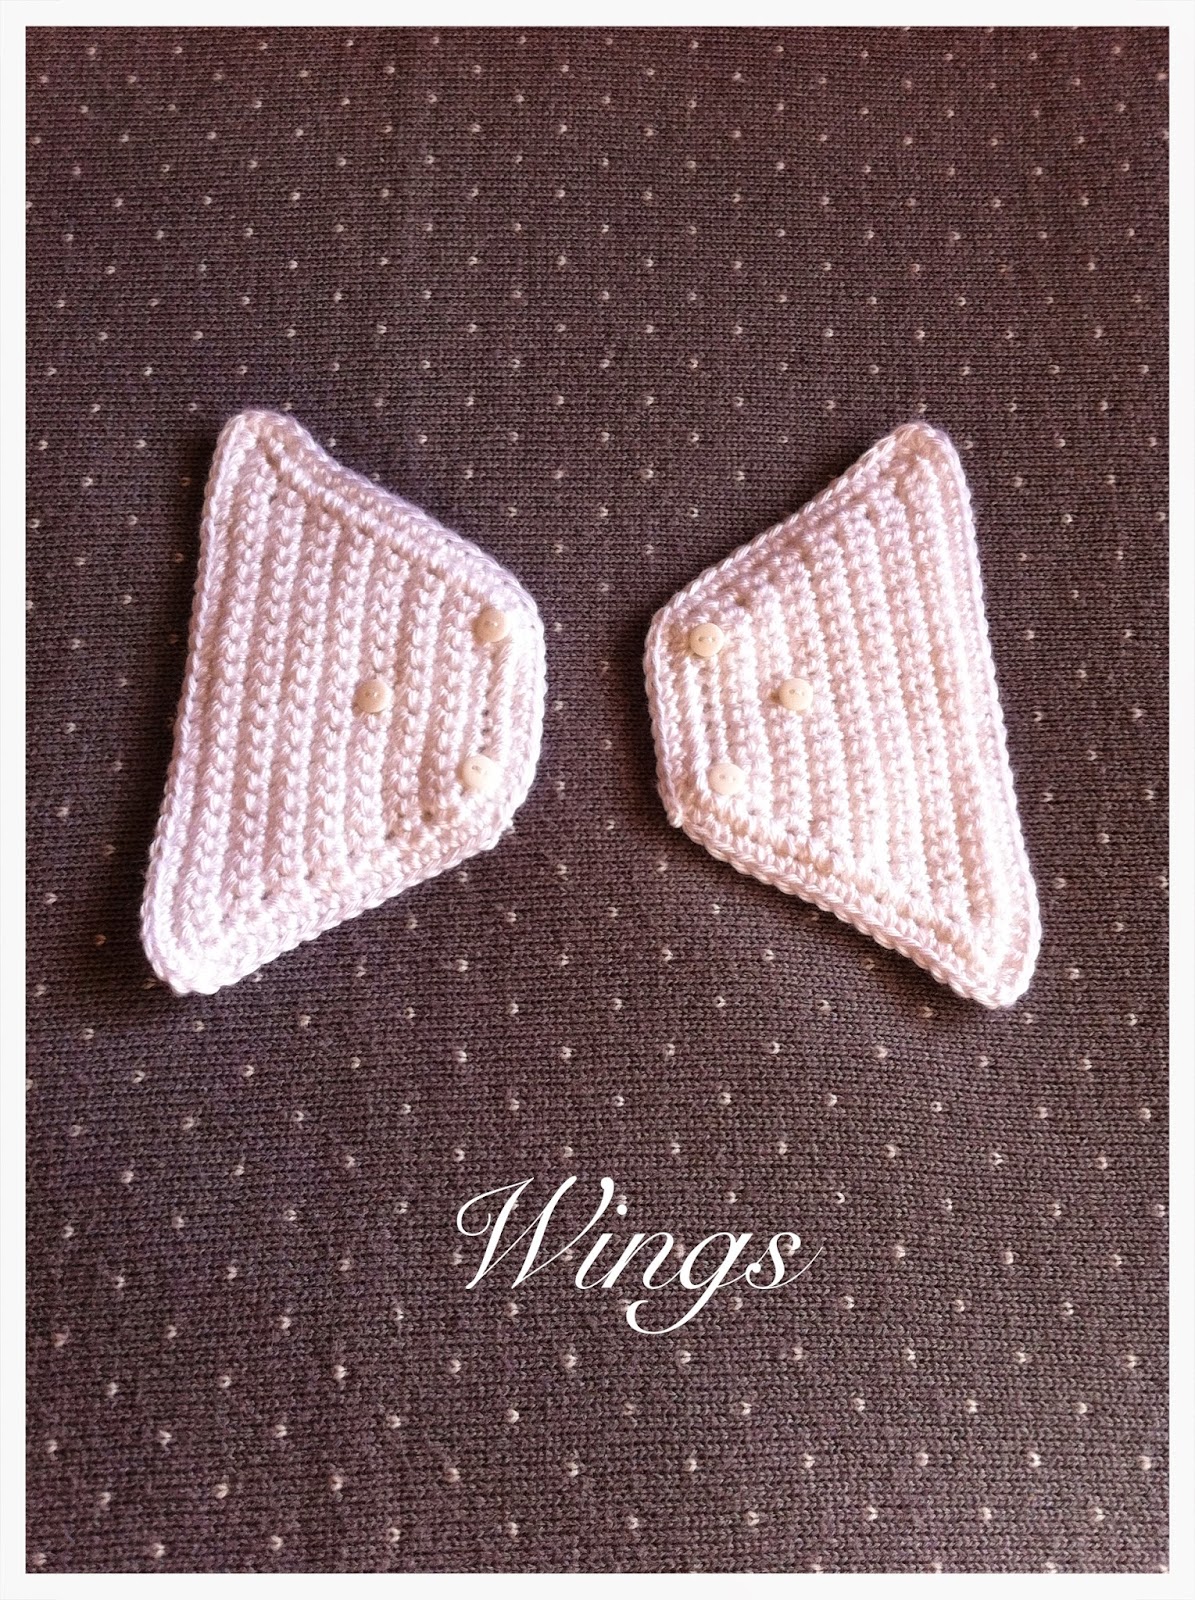
Wing pieces: Make 4 pieces
Ch 11,
Row 1: Sc across. (10 sc)
Row 2: Increase in first and last sc. (12 sc)
Rows 3-12: Repeat rows 1 and 2.
Row 13: Repeat row 1.
Row 14: Increase in first 2 and last 2 sc of row. (26 sc)
Row 15: Repeat row 2. (28 sc)

Border: Sc 14 down side, sc 10 across bottom, sc 14 down other side, slst in next sc. Fasten off.

Wings:


After you have the 4 wing pieces made, put wrong sides together of 2 wing pieces. Join them together by sc around. Put 3 sc in each corner of outer wing but not of inner wing. This will make the inside of the wing rounded and the outside of the wing more pointy.

Once the dress is finished and the wings are complete, finish "My Little Angel" by weaving the ribbon in-between rows 10 and 11 of dress. To keep the ribbon from fraying, burn the ends of the ribbon with a lighter. Attach the wings to the dress by putting the wings where you want them to lay on the dress and pushing the buttons on the wings through the dress.

Sew the medium size button to the top back of dress.

Sew the 6 small buttons to the two wings as the picture shows.

Shoes:
Follow my Mary Janes pattern.

Bonnet: Use size "I" hook

Magic circle,
Round 1: Ch 1, 11 hdc. Join.
Round 2: Ch 1, 2 hdc in each stitch around. Join. 22 hdc.
Round 3: Ch 1, (2 hdc, hdc) around. Join. 33 hdc.
Round 4: Ch 1, (2 hdc, hdc 2) around. Join. 44 hdc.
Round 5: Ch 1, This is a partial round. Hdc 36. Do not join. Ch 1, turn.
Note: In Row 6 of the Bonnet, you will have to leave an extra stitch somewhere in the middle of the row in order to end with a sc in the last stitch.
Row 6: (Sc, skip 2, 5 dc, skip 2) across.
Row 7: Turn, ch 3, 2 dc, (skip 2, sc, skip 2, 5 dc) to last stitch. In last stitch, 3 dc. Ch 1, turn.
Rows 8-13: Repeat Rows 6 and 7.
Row 14: Working on the bottom of the bonnet, sc across side, sc 8 across back, sc across other side. Slst in corner of bonnet.
Row 15: Ch 1, turn. Slst in first sc, sc across remaining stiches, slst in last sc. Turn.
Row 16: Slst in fist sc, sc across remaining stiches, slst in last sc. Fasten off.


Weave in ribbon in-between rows 12 and 13 of bonnet.

Your "My Little Angel" outfit is now complete!

Thursday, January 29, 2015

Valentine Baby Layette


Get your baby girl all ready for Valentine's Day with this adorable new layette set!!

Size: Approximately 0-3 months. The bonnet may fit a newborn better.

Materials:
Red and White Simply Soft Yarn
Size "H" hook for jacket and booties
Size "I" hook for bonnet
Tapestry Needle
Buttons: one for jacket and two for shoes

Special Stitches:
Shell Stitch: (Sc, skip 2, 5 dc, skip 2) across.
Half Shell Stitch: Instead of 5 dc, only do 3 dc. This will make the rows straight if you do a "Half Shell Stitch" at the beginning and end of rows starting with a shell.

Sweater: Ch 47,
Row 1: Sc 10, 3sc, sc, 3sc, sc 20, 3sc, sc, 3sc, sc 10. (Ch 1 and turn at the end of each row unless stated otherwise). For the top of the sweater, it is initially going to look like an unjoined rectangle.

Row 2: Sc 11, 3sc, sc 3, 3sc, sc 22, 3sc, sc 3, 3sc, sc 11.

Row 3: Sc 12, 3sc, sc 5, 3sc, sc 24, 3sc, sc 5, 3sc, sc 12.

Row 4: Sc 13, 3sc, sc 7, 3sc, sc 26, 3sc, sc 7, 3sc, sc 13.

Row 5: Sc 14, 3sc, sc 9, 3sc, sc 28, 3sc, sc 9, 3sc, sc 14.

Row 6: Sc 15, 3sc, sc 11, 3sc, sc 30, 3sc, sc 11, 3sc, sc 15.

Note: In this next row, we are going to make the arm hole.

Row 7: Sc 17, ch 11, skip 13 stitches, sc 34, ch 11, skip 13 stitches, sc 17.

Row 8: Sc 17, sc across 11 chains, sc 34, sc 11 chains, sc 17. At this point, you should have 90 sc.

You will now be beginning the shell rows.

Row 9: This row begins with a sc, so follow the "Shell Stitch" directions written in the "Special Stitches" section at the top of the page.

Note: To be able to end with a sc, you will have to leave an extra stitch somewhere in the middle of the row. To do this, instead of skipping 2 stitches inbetween shell and sc, only skip 1 stitch. This note only needs to be done in row 9. After this, your rows will all come out even with 91 stitches.

Row 10: Begin and end this row with a "Half Shell Stitch" (also described in the "Special Stitches" section at the top). Continue the rest of the row as before with the regular "Shell Stitch".

Rows 11-20: Repeat Rows 9 and 10.

Border:

Sc 91 across bottom of jacket. Sc up side of jacket. Ch 3 for button hole. Sc 46 around neck. Sc down other side of jacket. Join with slst in beginning stitch of border.

Ch 1, but Do Not Turn!

Shell Stitch across bottom of jacket. At the end of the row, slst after last sc and fasten off.

Arms:
Round 1: Join on the back of the jacket at the bottom of the armhole. Sc 28 evenly around. (If 28 doesn't seem to fit at first, just work with it until you fit 28).

Round 2-8: Sc around.

Round 9: Evenly decrease 2 stitches. (26 stitches).

Round 10-16: Sc around.

Round 17: Evenly decrease 2 stitches. (24 stitches).

Round 18-20: Sc around.

Round 21: Evenly decrease 2 stitches. (22 stitches). Fasten off.

Ties: Ch 52 for arm ties and 102 for belt. Weave in belt tie in-between rows 7 and 8 of jacket. Weave in arm ties in-between rounds 20 and 21 of arms.

To finish, sew a button to the top of the jacket.

Bonnet: Use size "I" hook. DO NOT TURN UNTIL ROW 6.
Magic circle,

Round 1: Ch 1, 11 hdc. Join.

Round 2: Ch 1, 2 hdc in each stitch around. Join. 22 hdc.

Round 3: Ch 1, (2 hdc, hdc) around. Join. 33 hdc.

Round 4: Ch 1, (2 hdc, hdc 2) around. Join. 44 hdc.

Round 5: Ch 1, This is a partial round. Hdc 36. Do not join

Row 6: Begin this row with the "Shell Stitch" directions.

Note: Just as you had to leave an extra stitch in Row 9 of the jacket for the row to come out evenly, in Row 6 of the Bonnet, you will have to do the same thing.

Row 7: Begin and end this row with a "Half Shell Stitch". Continue the rest of this row as before with the "Shell Stitch".

Rows 8-13: Repeat Rows 6 and 7.

Row 14: Working on the bottom of the bonnet, sc across side, sc 8 across back, sc across other side. Slst in corner of bonnet.

Row 15: Ch 1, turn. Slst in first sc, sc across remaining stiches, slst in last sc. Turn.

Row 16: Slst in fist sc, sc across remaining stiches, slst in last sc. Fasten off.

Tie:
With white, ch 102. Fasten off. Weave in tie in-between rows 12 and 13 of bonnet.

Shoes: Follow my Mary Janes pattern.

Now your Valentine Baby Layette is all ready for your little sweetheart. 


Sunday, January 25, 2015

Springtime Baby Layette


Are you ready for a baby layette pattern where you can use worst weight yarn? Here is the latest layette creation of mine. I hope you enjoy. If you have any questions, or if the count isn't seeming to line up, please feel free to leave me a comment with your question, and I will reply as soon as I can. - Taylor

Size: Approximately 0-3 months. The bonnet may fit a newborn baby better.

Materials:
Simply soft yarn - yellow and purple
Size "H" hook for jacket and shoes
Size "I" hook for bonnet
Tapestry needle
5 small buttons

Special Stitches:
Cross Stitch: Skip next stitch, dc. Now, dc in the stitch you previously skipped.
Shell Stitch: (Sc, skip 2, 5dc, skip 2)  repeat.

Sweater: Ch 47,
Row 1: Sc 10, 3sc, sc, 3sc, sc 20, 3sc, sc, 3sc, sc 10. (Ch 1 and turn at the end of each row unless stated otherwise). For the top of the sweater, it is initially going to look like an unjoined rectangle.

Row 2: Sc 11, 3sc, sc 3, 3sc, sc 22, 3sc, sc 3, 3sc, sc 11.

Row 3: Sc 12, 3sc, sc 5, 3sc, sc 24, 3sc, sc 5, 3sc, sc 12.

Row 4: Sc 13, 3sc, sc 7, 3sc, sc 26, 3sc, sc 7, 3sc, sc 13.

Row 5: Sc 14, 3sc, sc 9, 3sc, sc 28, 3sc, sc 9, 3sc, sc 14.

Row 6: Sc 15, 3sc, sc 11, 3sc, sc 30, 3sc, sc 11, 3sc, sc 15.

Note: In this next row, we are going to make the arm hole.

Row 7: Sc 17, ch 11, skip 13 stitches, sc 34, ch 11, skip 13 stitches, sc 17.

Row 8: Sc 17, sc across 11 chains, sc 34, sc 11 chains, sc 17. At this point, you should have 90 sc.

Row 9: Sc dec, dc cross stitch across to last two stitches, sc dec.

Rows 10-18: Repeat row 9. At the end of row 18, you should have 70 stitches.

Border: Sc 70 across bottom of jacket. Sc 18 up side of jacket. Ch 3 for button hole. Sc 46 around neck. Sc 18 down other side of jacket. Join with slst in beginning stitch of border.

Ch 1, but DO NOT TURN.

Shell stitch only across bottom of jacket. Slst in stitch after last sc. Fasten off.

Arms:
Round 1: Join on the back of the jacket at the bottom of the armhole. Sc 28 evenly around. (If 28 doesn't seem to fit at first, just work with it until you fit 28).

Round 2-8: Sc around.

Round 9: Evenly decrease 2 stitches. (26 stitches).

Round 10-16: Sc around.

Round 17: Evenly decrease 2 stitches. (24 stitches).

Round 18-20: Sc around.

Round 21: Evenly decrease 2 stitches. (22 stitches). Fasten off.

Flowers: make 4

Magic circle, (ch 4, slst in ring) 6X. Tighten ring and fasten off leaving a long string for sewing to jacket.

Arm Ties: make 2

Ch 52. Fasten off. Weave around arms as shown in the picture above.

Belt Tie:

Ch 102. Fasten off. Weave around chest section as shown in the picture above. Approximately between rows 7 and 8.

Once the flowers are sewn onto the jacket, sew small buttons to the center of the flowers and one to the top of the jacket on opposite side of button hole. 

Now onto the bonnet.

Bonnet: Use size "I" hook. DO NOT TURN UNTIL ROW 6.
Magic circle,

Round 1: Ch 1, 11 hdc. Join.

Round 2: Ch 1, 2 hdc in each stitch around. Join. 22 hdc.

Round 3: Ch 1, (2 hdc, hdc) around. Join. 33 hdc.

Round 4: Ch 1, (2 hdc, hdc 2) around. Join. 44 hdc.

Round 5: Ch 1, This is a partial round. Hdc 36. Do not join.

Row 6: Ch 1, turn. 2 hdc, hdc 34, 2 hdc. Turn. 38 hdc.

Row 7-12: Ch 3 (counts as first dc), cross stitch to last stitch, dc in last stitch. Turn.

Row 13: (Ch 3, slst in next dc) across.

Row 14: Working on the bottom of the bonnet, sc 11 across side, sc 8 across back, sc 11 across other side. Slst in corner of bonnet. (30sc).

Row 15: Ch 1, turn. Slst, sc 28, slst in last stitch. Turn.

Row 16: Slst in fist sc, sc 26, slst in last sc. Fasten off.

Tie: Ch 102. Fasten off. Weave into bonnet right next to the frilly stitching.

Sandals: Click on this link for my Baby Bow Sandals pattern.


Now your Springtime Baby Layette is complete!

Sunday, August 3, 2014

Mary Janes


Size: 0-3 months (3 1/2 inch sole)

Materials:
Simply Soft Yarn
Size "H" Crochet Hook
Black Buttons
Tapestry Needle
Thread
Thread Needle
Scisors

Sole: Make 2
With white, ch 9,
Row 1: 2 sc in second ch from hook, sc 6, 3 sc, (now working on opposite side of foundation ch) sc 7. Join with slst at beginning of row now and throughout.
Row 2: Ch 1, sc, 2 sc, sc 4, 2 sc, 2 hdc, 2 dc, dc, 2 dc, 2 hdc, 2 sc, sc 4, 2 sc.
Row 3: Ch 1, sc, 2 sc in next 2, sc 7, 2 sc in next 3, sc, 2 sc in next 3, sc 7, 2 sc in next 2.
Row 4: ch 1, sc 16, hdc 5, sc 15. Fasten off. (36 stitches)

Beginning of top:
Row 5: In back loops only, sc around. Fasten off

Join in center back with black yarn.
 
Row 6: Sc 13, hdc, dc, (dc dec) X3, dc, hdc, sc 13.
Row 7: Sc 11, hdc, dc, (dc dec) X4, dc, hdc, sc 10.
Row 8: Sc 12, (sc dec) X3, sc 11.

Right shoe only!!!

Row 9: Slst in next sc and in following 7 sc. Ch 13, skip 3 ch then slst down remaining ch to shoe, slst remaining 17 around shoe. Join with slst to beginning slst. Fasten off.

Left shoe only!!!

Row 9: Slst in next sc and in following 17 stitches. Ch 13, skip 3 ch then slst down remaining ch to shoe, slst remaining 7. Join with slst to beginning slst. Fasten off.

With white yarn, weave yarn around bootie right below the slst row, then tie a bow in front corner.


Once everything else is complete, sew on a button. Count 8 slst from center back, then sew the button below the white bow thread.

Too cute!!!

Baby Bow Sandals


Size: 0-3 months (3 1/2 inch sole)

Materials:
Simply Soft Yarn
Size "H" Crochet Hook
Tapestry Needle
Thread
Thread Needle
Buttons

Sole (Same As Baby Loafers Sole): Make 4
Ch 9,
Row 1: 2 sc in second ch from hook, sc 6, 3 sc, (now working on opposite side of foundation ch) sc 7. Join with slst at beginning of row now and throughout.
Row 2: Ch 1, sc, 2 sc, sc 4, 2 sc, 2 hdc, 2 dc, dc, 2 dc, 2 hdc, 2 sc, sc 4, 2 sc.
Row 3: Ch 1, sc, 2 sc in next 2, sc 7, 2 sc in next 3, sc, 2 sc in next 3, sc 7, 2 sc in next 2.
Row 4: ch 1, sc 16, hdc 5, sc 15. Fasten off. (36 stitches)


Once the soles are made, put two of them together (with the wrong sides facing each other) to make the bottom thicker. Match up the backs, then sew them together. I've posted pictures below of how I sewed them.
Top of Bootie
Bottom of Bootie
Bottom once finished
Top once finished


 After the soles are sewn together, begin making the back of the bootie.

Back:
Row 1: Sc 13 across center back (as the pictures show).
Row 2-6: Ch 1, turn. Sc across. Do Not Finish Off.


Right Shoe Only:
Sc one more row so the back is 7 rows high. At the end of this row, ch 14. Skip 3 ch, then sc back across the remaining 11 ch. Join with slst and fasten off. Once you fasten off, join with a slst in corner, and slst across the back and the strap (24 stitches). Fasten off.


Left Shoe Only:
At the end of row 6, ch 14. Skip 3 ch, then sc back across the remaining 11 ch. Continue to sc across back of shoe. After this, turn and slst across the back and the strap (24 stitches). Fasten off.


Sew on a button for the strap to connect to.

Bow:
For the bow, you will make a long strap and connect it to the other side of shoe before making it into a bow. For the shoes to look their best, make sure you begin this strap on the side that will be facing out. For the right shoe, join with a sc in 8th stitch from back. For the left shoe, join with a sc in the 3rd stitch from the back. Sc 5 across for the bow. (5 sc)

Row 2-13: Ch 1, turn. Sc across. (5 sc). Fasten off at end of row 13 leaving a long string for sewing.
Left shoe


Right shoe
Right shoe
Now that the strap is crocheted, sew it to the other side of the shoe with a whip stitch. There should be three stitches between back and toe strap on each side.


Now you're ready to turn the strap into a bow. Begin by weaving in the leftover yarn to the center of the strap.


Then, begin the wrapping process.


Tighten the string up, and wrap the remaining string around approximately 7 times. Be careful to make sure your bow is laying the way you want it to before wrapping too much.


Once you're finished wrapping around the strap to make the bow, secure it tightly and weave in ends.


And there you have it (:

Monday, June 30, 2014

Dog Lovey


Materials:
Simply Soft Yarn
Size "G" Needle

Head (make 2 half circles, then stuff and whip stitch together): Tan yarn
Magic Circle
Round 1: 5 sc
Round 2: 2 sc in each. 10 sc
Round 3: (2 sc, sc 1) around15 sc
Round 4: (2 sc, sc 2) around. 20 sc
Round 5: (2 sc, sc 3) around. 25 sc
Round 6: (2 sc, sc 4) around. 30 sc
Round 7-10: sc around. 30 sc
Fasten off leaving long strings for sewing.


Ears: Brown yarn
Ch 4,
Row 1-4: Hdc across. Ch 1, turn. (3 hdc)

At end of row 4, continue by sc around ear (2 sc in the bottom corners). When you get to the top of the ear, skip 1 sc, slst in next stitch. Fasten off leaving a long string for sewing.

Eye Patch: (Either you can make the circle below, or you can find a heart pattern online and use a heart for the eye patch).
Magic circle,
Round 1: 6 sc.
Round 2: 2 sc in each sc around. (12 sc). Fasten off leaving long string.

Nose:  Magic circle,
6 sc. Fasten off leaving a long string to sew on nose and embroidery mouth and eyes.

Collar:
Slst around the head the row under the mouth.

Blanket: 
Make a granny square of your choosing, and make it as big as you want the lovey to be.


For the girl dog lovey, you can make a bow to sew on next to the ear. Once all of the pieces are made, sew them to the head; then, sew the head onto the center of the blanket. Enjoy!

Football Booties


Size: 0-3 months

Materials:
Simply Soft Yarn
Size "G" Needle

Front Part of Bootie:
Don't work in rounds. At the end of each row, join with a slst, then ch 1 to begin the next row. Also, do not turn, but continue working in the same direction.

With color A, ch 6,
Row 1: Sc in second ch from hook, sc 3, 3 sc, (working on opposite side of foundation ch) sc 3, 2 sc in last stitch. (12 sc)
Row 2: (2 sc, sc) around. (18 sc)
Row 3: (2 sc, sc 2) around. (24 sc)
Row 4: Sc around.
Row 5: Now with color B, sc around.
Rows 6-11: Switching back to color A, sc around. (24 sc)

Back Part of Bootie:
Row 12: Slst 4. Ch 1, turn. Sc in last slst made and in next 17 stitches. Ch 1, turn. (18 sc)
Row 13-18: Sc across. Ch 1, turn. (18 sc)

Slst back together. Fasten off.

Bootie Top:
Row 1: With color A, start in corner and sc around back of bootie. Slst next to front of tongue. Ch 1, sc 6 across tongue, slst next to beginning sc, slst in beginning sc. Fasten off.
Row 2: With color B, repeat row 1. Fasten off.

Ties:
Double up color B yarn for laces and threading. Start with laces and leave a long enough string at the beginning for tying shoe.

Baby Loafers


Size: 0-3 Months (3 1/2 inch long sole)

Materials:
Worsted weight yarn (I used yellow Red Heart yarn and pink Simply Soft yarn)
Two buttons
Size "F" Needle
Tapestry Needle

Sole (in yellow):
Ch 9,
Row 1: 2 sc in second ch from hook, sc 6, 3 sc, (now working on opposite side of foundation ch) sc 7. Join with slst at beginning of row now and throughout.
Row 2: Ch 1, sc, 2 sc, sc 4, 2 sc, 2 hdc, 2 dc, dc 2 dc, 2 hdc, 2 sc, sc 4, 2 sc.
Row 3: Ch 1, sc, 2 sc in next 2, sc 7, 2 sc in next 3, sc, 2 sc in next 3, sc 7, 2 sc in next 2.
Row 4: ch 1, sc 16, hdc 5, sc 15. Fasten off. (36 stitches)

Top of Loafer (in pink):
Row 5: Working in back loops only, join with a sc in middle back of sole. Sc around. (36 sc)
Row 6: Sc 14, dc dec in next 4, sc 14.
Row 7: Sc 11, dc dec in next 5, sc 11.
Row 8: Sc 12, dc dec in next 2, sc 11. Fasten off.

Toe Strap (in yellow):
(Leave a long string at beginning to sew onto shoe) Ch 15,
Row 1: Sc in second ch from hook and in each ch across. Ch 1, turn.
Rows 2-3: Sc in each stitch across. Fasten off leaving another long string for sewing.

Sew the toe strap onto the shoe. Evenly space 14 to 16 stitches in front of shoe and sew just to the sides of the shoe. You can add the flower button before sewing on the toe strap or after.

Enjoy!


Saturday, June 14, 2014

Button Bookmarks


Size "G" needle
Simply Soft Yarn
Buttons, beads, and ribbon

Row 1: Ch 4, 2 dc in 4th ch from hook, ch 2, sc in same ch.

Rows 2-15: Ch 3, turn, 2 dc in ch 2 space, ch 2, sc in same space.

Fasten off leaving a long string for sewing on buttons and beads.

Sew on the buttons and beads where you want them on your bookmark.

Add ribbon. Use a lighter to melt the ends of the ribbon to keep it from fraying.

Enjoy!!!

Sunday, April 27, 2014

Baby Tank Top

0-3 months


Materials:
Size "F" Needle
Simply Soft Yarn
Button
Sewing Needle

Top Front:
Ch 31,
Row 1: sc across (30 sc)
Rows 2-9: ch 1, turn. (sc, dc) across. (30 stitches)

At the end of row 9, ch 41 for tie. Slst down ch and join with a slst in top of dc from row 9. Fasten off.

On opposite side of top, join with a slst. Ch 41. Slst down chain and join with slst in top of sc from row 9. Fasten off.

Top Back:
Ch 31,
Row 1: sc across (30 sc)
Rows 2-5: ch 1, turn. (sc, dc) across. (30 stitches)

At the end of row 5, ch 46 for strap (the chain is longer on the back since the back is further down than the front). slst down ch and join with slst in corner dc of row 5. Do the same thing on the other side.

Body:
Row 1: Starting in middle of "top back", join with sc. Sc 15, ch 5 (be sure not to twist ch), join with sc in corner of "top front", sc 30, ch 5 (once again, be sure not to twist ch), join with sc in corner of "top front", sc last 14 stitches. Join with slst in first sc. (70 stitches... count is important).
Row 2: ch 1, (sc, dc) around. Join with slst in first sc. (70 stitches).
Row 3: ch 2,  dc in same stitch. Sc in next stitch. (dc, sc) around. (70 stitches).
Rows 4-18: Repeat rows 3 and 4. Fasten off.

Finishing:
Whip stitch around bottom of tank top. Add flower and button.

Flower:
Magic circle,
6 sc. Join with slst in first sc. ([ch 2, 2 dc, ch 2, slst,] in same sc. slst in next sc) repeat around. (6 petals). Fasten off leaving a long string for sewing.

Wednesday, March 19, 2014

Baby Sandals

size: 0-3 months


Size "H" needle
Simply soft yarn

Sole: With black, make 4
(The sole is not my own pattern. I followed the "Easy Baby Booties" pattern for the sole).

"Easy Baby Booties" pattern sole:
Rnd 1: ch 9, 3 sc in 2nd ch from hook, hdc in each of next 5 chs, dc in next ch, 5 dc in last ch, working on opposite side of foundation ch, dc in next ch, hdc in each of next 5 chs, 2 sc in last ch, join. (22 sts)
Rnd 2: Ch 2, 2 hdc in next st, hdc in each of next 7 sts, 2 hdc in each of next 5 sts, hdc in each of next 7 sts, 2 hdc in next st, join in 2nd ch of beg ch 2. (29 sts)
Rnd 3: Ch 1, sc in same st as beg ch-1, 2 sc in next st, sc in each of next 10 sts, 2 sc in each of next 6 sts, sc in each of next 10 sts, 2 sc in next st, join in first sc. (37 sc)

Now, with white, sew two of the soles together with wrong sides together. I went around the sole twice with the basket weave stitch to fill in the whole thing. Once you have it sewn together, tie a knot and cut a long enough string to tuck into the back of the sandal.

Back: white
Row 1: Working in the white, basket weave stitches, sc 13 evenly around back of sandal. ch 1, turn. (13 sc)
Rows 2-7: sc across. ch 1, turn. (13 sc)
Do not finish off. Continue onto strap.

Strap:
ch 14, skip 3 (for button hole), sc in remaining 11 stitches, slst across back of sandal. finish off.

slst across top of strap as well. Make sure you have straps going two different ways for left and right foot.

Toe Strap:
Slst in top layer of sole (first row of sole in corner).
ch 11, 3 sc, 2 hdc, sc, slst, sc, 2 hdc, 2 hdc, 2 sc. (You'll be leaving 2 stitches unworked now for the toe). Working on opposite side, 2 sc, 2 hdc, 2 hdc, sc, slst, sc, 2 hdc, 2 sc. slst in first sc. Don't finish off.

To make the loop for the strap to connect through the toe strap, ch 5. slst in middle of top circle. Fasten off.

Add a button to the top corner of the sandal.


Zebra Sundress


Size "F" needle
Simply soft yarn

0-3 months

Top: purple yarn
Ch 71,
Row 1: sc across. 70 sc
Rows 2-8: Shell stitch across. (3 dc in end instead of 5 to make it straight). 70 stitches
Row 9: sc across. 70 sc. Fasten off leaving a long string for sewing.

Bib: purple yarn
Working on wrong side, skip 19 sc.
Row 1: Join with sc in next sc. Shell stitch across 31 stitches. (You should have 20 stitches left unworked on one side and 19 stitches unworked on the other side).
Rows 2-4: Shell stitch across.

Tie: purple yarn
Rows 1-60: sc 3. Fasten off at the end of row 60.
Make a tie on the other side once you finish the first tie.

Sew up back of dress (Rows 1-9).

Skirt: (Start with black, and rotate black and white throughout rows. Sc rows are black, and dc rows are white.)
Row 1: Working with right side facing and on opposite end of top, sc around. 70 sc
Row 2: dc around. 70 dc
Row 3: (2 sc, sc 6) around. 80 sc
Row 4: repeat row 2. 80 dc
Row 5: (2 sc, sc 7) around. 90 sc
Row 6: repeat row 2. 90 dc
Row 7: (2 sc, sc 8) around. 100 sc
Row 8: repeat row 2. 100 dc
Row 9: (2 sc, sc 9) around. 110 sc
Row 10: repeat row 2. 110 dc
Row 11: (2 sc, sc 10) around. 120 sc
Row 12: repeat row 2. 120 dc
Row 13: sc around. 120 sc
Rows 14-17: rotate rows 2 & 13. Fasten off. Use purple yarn for next row.

Row 18: Shell stitch around. Fasten off.

Finish by adding a ribbon belt between the top of sundress and the skirt of sundress.